Getting approved for Google AdSense is a significant milestone—but it's only the beginning of your monetization journey. Many publishers celebrate approval, only to find their earnings disappointingly low. The difference between earning pocket change and building a sustainable income stream lies in optimization: the process of making strategic changes to improve your site quality, traffic, and ad performance .
This comprehensive guide walks you through every stage of the AdSense journey, from preparing for approval to maximizing revenue with proven optimization strategies. Whether you're applying for the first time or looking to boost earnings on an approved site, you'll find actionable steps to transform your AdSense performance.
Part 1: The Pre-Approval Foundation
Before you can optimize for profit, you need to get approved. In 2026, Google's approval standards are stricter than ever, with a heavy emphasis on E-E-A-T (Experience, Expertise, Authoritativeness, Trustworthiness) . Here's what you need to prepare.
Content Requirements: Quality Over Quantity
The most common reason for AdSense rejection is insufficient or low-quality content . Google wants to see that you're building a genuine resource, not a thin affiliate site or AI-generated content farm.
How Much Content Do You Need?
Industry consensus suggests aiming for 15 to 30 original articles before applying . Each post should be substantive—at least 1,000 words, with some experts recommending 1,500+ words for better approval odds .
What Makes Content "High Quality"?
Google's E-E-A-T framework provides the blueprint :
Experience: Content should demonstrate firsthand knowledge or practical experience with the topic. A travel blog should include personal travel stories; a tech blog should show hands-on testing.
Expertise: Content should be accurate, well-researched, and demonstrate subject knowledge. For topics like health or finance, author credentials become particularly important .
Authoritativeness: Your site should establish itself as a trusted source. This comes from consistent quality, proper citations, and clear authorship.
Trustworthiness: Be transparent about who you are, what you're offering, and any affiliate or advertising relationships.
Special Considerations: For YMYL (Your Money or Your Life) topics like health, finance, or legal advice, demonstrating expertise is critical. Add author bios with credentials, cite authoritative sources, and include appropriate disclaimers .
Essential Pages for Approval
Beyond content, your site needs foundational pages that establish legitimacy :
Privacy Policy: This is non-negotiable. Your policy must state that you use third-party ads like AdSense and explain what data you collect . You can use a privacy policy generator, but customize it to your specific site.
About Page: Introduce yourself, explain why you started your site, and share your expertise. This builds trust with both readers and Google's reviewers .
Contact Page: Provide a way for visitors and advertisers to reach you. An email address or contact form works well .
Technical Requirements
Google also evaluates your site's technical quality :
HTTPS: Your site must use secure HTTPS encryption.
Mobile-Friendly: With mobile traffic dominating, your site must display properly on all devices.
Fast Loading Speed: Aim for a PageSpeed score of 80+ using Google's PageSpeed Insights tool .
Clean Navigation: Your site should be easy to navigate, with clear menus and logical structure.
Pro Tip: Submit your site to Google Search Console early and upload a sitemap. This helps Google index your pages faster and demonstrates good technical SEO practices .
Application Process
Once your site is ready:
Sign in to AdSense with a fresh Google Account
Enter your site URL
Set your language and payment country (choose carefully—this affects PIN delivery)
Accept the terms and receive your ad code
Paste the code into your site's
<head>section (WordPress users can use the Insert Headers plugin)Submit for review
The review process typically takes days to a few weeks .
If You're Rejected: Common Fixes
Rejection isn't final—you can reapply after making improvements . Here are the most common rejection reasons and their solutions:
| Rejection Reason | Quick Fix |
|---|---|
| Too little low-quality content | Add 15-30 original, in-depth articles |
| Missing Privacy Policy | Create About, Contact, and Privacy Policy pages |
| Site looks "purely for money" | Prioritize user experience over monetization |
| No traffic or too new domain | Build organic traffic; 3-6 month old domains pass easier |
| Technical issues | Enable HTTPS, optimize mobile, improve speed |
| Weak E-E-A-T | Add author bios, demonstrate expertise |
Part 2: After Approval—Building Your Optimization Foundation
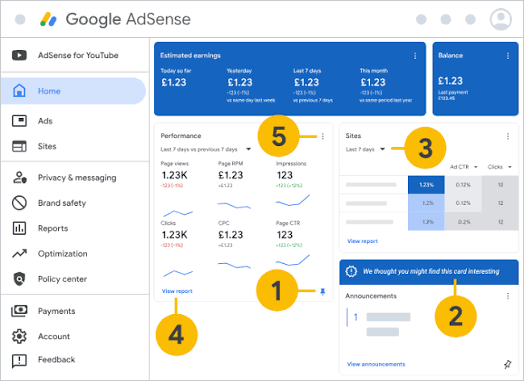
Congratulations on approval! Now the real work begins. Optimization is an ongoing process of improving your site, traffic, and ad performance .
Step 1: Master Auto Ads
Auto ads are Google's simplest and most effective ad solution. With one piece of code, Google's AI scans your site and automatically places ads where they're most likely to perform well .
Why Auto Ads Work
Auto ads offer several advantages:
Revenue Potential: Google's algorithms continuously analyze your pages and find new ad placements based on layout and content .
Ease of Use: One code snippet handles everything. Auto ads automatically adjust to site changes and ad settings .
Mobile Optimization: Auto ads automatically adapt to every screen size, including mobile-exclusive formats like anchor ads and vignettes .
Advanced Controls: You can fine-tune ad load and customize which formats appear .
Real Results: HiNative achieved a 20% uplift in total ad revenue using in-page Auto ads . FlipHTML5 increased revenue by 12% by optimizing vignette frequency .
Getting Started with Auto Ads
In your AdSense dashboard, navigate to Auto ads
Copy the one-line code and paste it into your site's
<head>sectionUse the settings panel to control ad types and frequency
Step 2: Configure Advanced Banner Settings
In 2026, AdSense replaced the old ad load slider with more granular controls for banner ads . This gives you precise control over:
Ad Quantity Cap: Set the maximum number of in-page ads on any page
Minimum Ad Spacing: Choose required spacing between ads to maintain user experience
Find More Ad Placements: Let AdSense automatically locate additional potential ad positions
Tip: Start with conservative settings and gradually increase ad density while monitoring user engagement metrics.
Step 3: Run Experiments
AdSense Experiments allow you to test different ad settings against each other to see which performs better . You can experiment with:
Ad formats and sizes
Ad placement
Color schemes
Ad density
How to Use Experiments Effectively:
Start with one variable at a time (e.g., test anchor ads on vs. off)
Run experiments for at least 2-4 weeks to gather sufficient data
Let Google automatically apply improvements to revenue or user experience
Step 4: Optimize Ad Viewability
Viewability—whether ads are actually seen by users—directly impacts your revenue. Google recommends targeting a viewability rate of 70%+ for your top-performing ad units .
Viewability Best Practices:
Reduce Page Length: Shorter pages mean users see more of each ad unit
Place Ads Above the Fold: Position high-value ads where users see them immediately
Use Vertical Ad Sizes: Particularly effective on desktop
Create Engaging Content: Users who stay longer see more ads
Increase Page Speed: Faster loading pages improve viewability
Step 5: Use Responsive Ad Units
Fixed-size ad units can leave money on the table, especially on mobile devices where screen sizes vary . Switch to responsive ad units by updating your ad code. If you can't update the code, enable the ad sizes optimization setting to let AdSense handle it automatically.
Step 6: Manage Ad Blocking Carefully
While it's tempting to block ads you don't want to display, over-blocking can actually hurt your revenue . When you block too many advertiser URLs, ad networks, or categories, fewer advertisers compete in the auction for your inventory, potentially lowering CPCs.
Best Practice: Only block categories that are clearly incompatible with your content or brand values. Consider using the Ad Experience Report to identify and fix issues rather than blanket blocking.
Step 7: Create an AMP Site
Accelerated Mobile Pages (AMP) provide faster page load times and better user experience on mobile . Creating an AMP-first site can lead to:
More mobile traffic
Higher user engagement
Improved AdSense performance
Part 3: Advanced Optimization—Driving Traffic and Maximizing Revenue
Once your ad implementation is solid, focus on two critical factors: traffic quality and user engagement.
Develop a Traffic Strategy
AdSense earnings depend on traffic volume and quality. Use these tools to build a sustainable traffic strategy :
Google Search Console: Monitor search performance and identify opportunities
Google Analytics: Understand audience behavior and optimize content
Google Trends: Identify trending topics in your niche
Using Analytics to Improve Revenue
Google Analytics provides insights that directly impact AdSense income :
Behavior Metrics: Monitor bounce rate, pages per session, and session duration. Lower bounce rates and higher engagement typically correlate with increased ad revenue .
Geo Location: Identify where your audience is located. Timing social media posts and email newsletters to match peak activity times drives more visitors to your site .
Demographics and Interests: Use these features to understand what your audience wants. Create content tailored to their interests for better engagement and loyalty .
User Flow Analysis: Identify top landing pages and concentrate on improving user experience there. Reducing bounce rates on landing pages often leads to overall revenue increases .
Pro Tip: Enable "Remarketing and Advertising" reporting features in Analytics to access Demographics and Interests data. This allows Analytics to work with AdSense cookies for anonymized audience insights .
Optimize User Experience
User experience quality is key to long-term success . Web Vitals can help you quantify and improve your site experience.
Core Areas to Focus On:
Page Speed: Use Google PageSpeed Insights to check and improve loading times
Content Quality: Continuously create engaging, valuable content
Ad Placement: Balance monetization with user experience—avoid intrusive ads that drive users away
Building Loyalty with Returning Visitors
Returning visitors are incredibly valuable . They're more engaged, more likely to trust your content, and more likely to interact with ads over time.
Strategies for Returning Visitors:
Build an email list to notify subscribers of new content
Consider an iOS app with push notifications
Regularly change ad positions to prevent "ad blindness" among repeat visitors
Part 4: The Optimization Cycle
Optimization isn't a one-time effort—it's a continuous cycle:
Implement: Apply new settings or strategies
Measure: Monitor performance through AdSense reports and Analytics
Analyze: Identify what's working and what isn't
Adjust: Make informed changes
Repeat: Continuously refine your approach
Key Metrics to Track
CPC (Cost Per Click): How much you earn per click
RPM (Revenue Per Mille): How much you earn per thousand impressions
CTR (Click-Through Rate): How often users click ads
Viewability Rate: How often ads are actually seen
Bounce Rate: How quickly users leave
Pages Per Session: How much content users consume
When to Seek Professional Help
If you've implemented these strategies and still aren't seeing desired results, consider:
Consulting AdSense's Optimization page for custom recommendations
Testing alternative ad networks alongside AdSense
Hiring a monetization consultant specializing in AdSense
Conclusion: From Approval to Sustainable Profit
The journey from AdSense approval to meaningful profit requires patience, strategic thinking, and continuous optimization. By building a strong foundation before approval, implementing Auto ads effectively, running thoughtful experiments, and using Analytics to understand your audience, you can transform your site into a reliable income source.
Remember that optimization is a marathon, not a sprint. Start with the fundamentals: quality content, solid technical foundations, and Auto ads. Then progressively refine your approach using experiments and data analysis. As Google's algorithms and AdSense features continue to evolve, staying informed and adaptable will be your greatest competitive advantage.
The publishers who succeed are those who view optimization as an ongoing process—testing, measuring, learning, and iterating. Your AdSense journey doesn't end with approval; it begins there. Use this guide as your roadmap, and start optimizing today.